
Home Walks That Feel Like a Mini Getaway
Transform your home walks into a mini getaway by creating a tranquil garden pathway filled with vibrant plants or a cozy indoor beach with warm sand beneath your feet. Consider a forest trail adventure in your living room, enhanced by nature sounds that elevate your experience. You can also embrace the serenity of a spa circuit, complete with calming scents and soothing music. Explore these ideas further to discover your perfect indoor retreat.
Key Takeaways
- Create a tranquil garden pathway indoors to connect with nature and promote calmness during your walks.
- Set up a beach-themed area with sand and coastal decor to evoke relaxation and beachfront bliss.
- Incorporate plants and nature sounds for a soothing forest trail experience that enhances your home walking routine.
- Design cozy nooks with urban vibes and city sounds to transform your space into a vibrant city getaway.
- Establish a serene spa circuit with calming scents, gentle stretching, and soothing soundscapes for a rejuvenating walking experience.
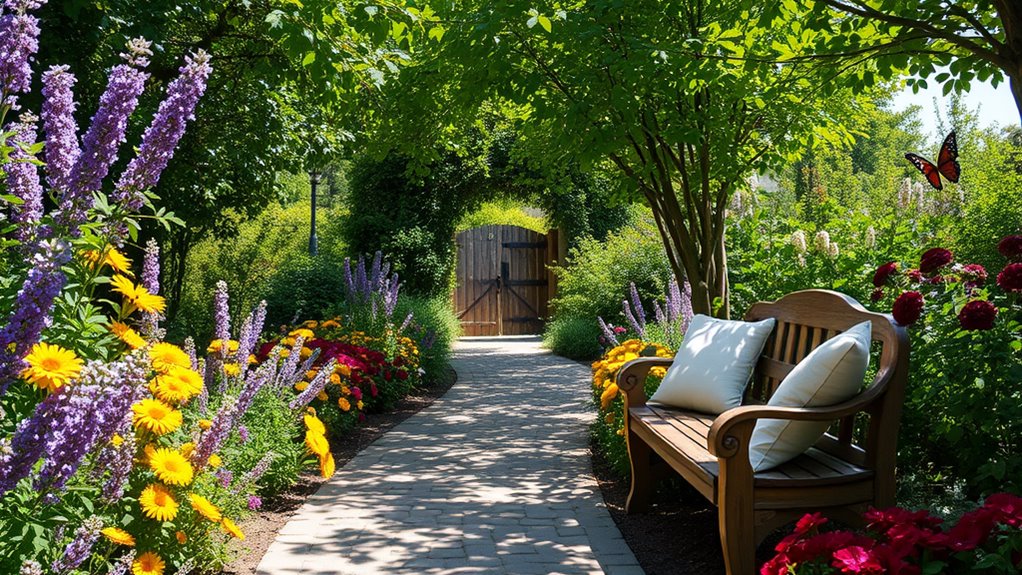
The Tranquil Garden Pathway
As you stroll along the tranquil garden pathway, the gentle rustle of leaves and the fragrant scent of flowers create an immediate sense of calm.
This peaceful retreat can be your sanctuary, where each step invites you to slow down and breathe. Incorporating an indoor walking routine within this serene space allows you to connect with nature without leaving home.
Picture yourself surrounded by vibrant blossoms and greenery, every stride transporting you away from daily worries. The soft sunlight filters through the leaves, wrapping you in a warm embrace.
As you walk, you’ll feel your heart lighten, your mind clear, and your spirit lift. This isn’t just exercise; it’s a gentle reminder of the beauty that exists within your home. By engaging in these routines, you can enhance your well-being and encourage the benefits of exercise that rejuvenate your body and mind.
Beachfront Bliss: Walking on Sand Indoors
Imagine stepping into your home and feeling the warmth of sand beneath your feet, bringing that beachfront bliss indoors.
You can easily transform your space with coastal decor that inspires relaxation and serenity.
Let’s explore how creating your own indoor sandy oasis can elevate your everyday experience.
Indoor Sand Experience
Creating an indoor sand experience transforms your home into a mini beach getaway. Picture feeling fine, warm sand beneath your feet as you stroll through your living space. With just a few elements, you can evoke that beachy bliss every day.
| Element | Description |
|---|---|
| Sand Pit | A designated area filled with clean sand. |
| Beach Chairs | Cozy seating for relaxation or reading. |
| Artificial Plants | Faux palm trees for that tropical feel. |
| Soothing Sounds | White noise machines or playlists with ocean sounds. |
| Ambient Lighting | Soft, warm lights mimicking sunset hues. |
Embrace this enchanting vibe and let the worries of the day melt away. You deserve a slice of paradise right in your home.
Coastal Decor Inspiration
Transforming your space into a coastal oasis isn’t just about the sand—it’s about capturing the essence of beach life through decor.
Consider soft, muted tones reminiscent of sandy shores and gentle waves. Light blues, seafoam greens, and crisp whites breathe serenity into your home. Adding textures with woven baskets, linen throws, and driftwood accents creates a beachy vibe.
Incorporate marine motifs, like shells or coral, to keep the seaside spirit alive. Use large, airy windows dressed with sheer curtains to invite natural light and mimic the openness of the beach.
And don’t forget fragrant candles or diffusers with ocean scents; they’ll transport you to your favorite coastal retreat. Let every corner of your home echo the blissful tranquility of beachfront living.
Relaxation and Serenity
Relaxation and serenity can effortlessly fill your home when you bring the essence of the beach indoors.
Imagine walking barefoot across soft, sun-kissed sand that transforms your living space into a coastal paradise. With every step, you can almost hear the gentle lapping of waves, feel the ocean breeze, and breathe in the salty air.
Create a sandy nook with a cozy chair and ocean-themed decor, where you can unwind with a book or sip your favorite drink. Add soft, ambient lighting to evoke sunsets, wrapping you in a warm embrace.
Surround yourself with the soothing colors of the sea, inviting calm and reflection. This isn’t just a walk; it’s your personal escape to beachfront bliss.
Forest Trail Adventure in Your Living Room
While you mightn’t have a lush forest in your backyard, bringing a forest trail adventure into your living room is easier than you think.
Start by gathering a few plants—ferns, snake plants, or even a small bonsai. Arrange them strategically to create a green oasis. Use soft lighting to mimic the gentle glow of sunlight filtering through the trees.
Next, play nature sounds—birds chirping, leaves rustling—on low volume, wrapping you in a calming atmosphere.
Don’t forget a cozy blanket and a cup of herbal tea to sip on as you immerse yourself in this tranquil space. Incorporating soothing herbal teas into your routine can enhance relaxation and improve sleep quality.
Close your eyes, breathe deeply, and let your imagination guide you on a serene journey through your very own indoor forest. Enjoy the escape!
Serene Spa Circuit: A Walk to Rejuvenate
After creating your indoor forest, consider stepping into a serene spa circuit that rejuvenates both body and mind.
Begin your journey in a softly lit room, filled with the gentle scent of lavender. As you walk slowly, inhale deeply, letting the calming aroma wash over you.
Next, find a cozy corner for gentle stretching; let your muscles unwind and release tension.
Move to a quiet spot with soothing soundscapes—perhaps soft rain or ocean waves—encouraging you to relax deeper.
Finally, treat yourself to a warm herbal tea, wrapping your hands around the mug, feeling its warmth seep into your being. Herbal teas like chamomile or peppermint are excellent choices that can provide instant stress relief and enhance your relaxation experience.
This mini getaway in your own home connects you to tranquility, reminding you how vital self-care is in your daily life.
Urban Escape: Exploring City Vibes at Home
Sure! Here is the revised content with the added sentence:
How can you bring the vibrant energy of the city into your home? Start by curating a space that reflects urban life. Choose bold artwork that sparks conversation and mirrors city murals.
Incorporate lively plants to mimic street-side greenery, or hang fairy lights to evoke bustling evenings. Set up cozy nooks where you can sip coffee while listening to city sounds, perhaps by opening a window.
Mix textures, like sleek metal with warm wood, for that chic city feel. Finally, create a playlist of your favorite city tunes to infuse rhythm into your space. Additionally, consider embracing eco-friendly living by choosing sustainable materials and plants, which not only enhance your urban vibe but also contribute to a healthier planet.
Let me know if you need any more adjustments!
Cozy Cabin Retreat: A Walk for Comfort
As you step into a cozy cabin retreat, the warmth of rustic charm wraps around you like a well-loved blanket. Every corner invites you to pause and savor the comfort beneath your feet. Imagine a world where the outside chill can’t touch you, creating a perfect space for intimacy and connection.
| Element | Feelings | Experience |
|---|---|---|
| Soft Textures | Embraced | Curling up with a book |
| Warm Lighting | Inviting | Sharing stories over tea |
| Gentle Scents | Tranquil | Breathing in cedar and pine |
In this sanctuary, you find solace, a chance to disconnect from the chaos outside. Let every moment envelop you in peace, making each breath a celebration of comfort. You might even indulge in some at-home spa treatments using everyday ingredients from your kitchen to enhance your relaxation experience.
Nature Sounds: Creating an Immersive Experience
What if you could enhance your home walk with the soothing symphony of nature sounds?
Picture yourself stepping into a world where chirping birds and rustling leaves envelop you, whisking you away from daily stress. You could play soft forest melodies or water trickling gently in the background, making each step feel more intentional.
As you walk, imagine the warmth of sunshine filtering through trees, the earth’s scent mingling with fresh air, and a gentle breeze kissing your skin.
These sounds wrap around you, creating an immersive experience that invites you to breathe deeply and connect with every moment.
It’s not just a walk; it’s an escape, a chance to recharge in your serene sanctuary, right at home.
The Mindful Meander: A Journey Through Reflection
As you step outside for your mindful meander, embrace the serenity of nature around you.
Each step opens a doorway to reflection, creating space for thoughts and insights to flow.
Consider keeping a journal handy to capture these moments of clarity sparked by your movement.
Embrace Nature’s Serenity
While life often pulls you in countless directions, stepping into nature offers an immediate sense of peace and clarity.
As you breathe in the fresh air, let the gentle rustle of leaves guide your thoughts to a quieter place. Picture walking along a winding path, where every step connects you to the ground beneath. The sun filters through the trees, casting dappled light that dances around you, reminding you of life’s simple joys.
Embrace the stillness, let nature cradle your worries, and awaken your senses. Allow the sweet sounds of chirping birds and whispering winds to become your soundtrack, drawing you deeper into this serene moment.
In nature, you’ll find both solace and strength, helping you truly reconnect with yourself.
Reflective Journal Practices
A reflective journal can transform your walks into meaningful journeys of self-discovery. As you wander, take a moment to note your thoughts and feelings. Capture the whispering winds and the colors around you; let them inspire honest reflections.
When you pause to write, you create space for intimacy with yourself. You’ll find clarity in your experiences and memories to cherish.
Each step can evoke a new insight, so be open to what arises. This practice encourages connection—not just with nature, but with your inner self.
Embrace the quiet moments and listen to your heart. Through journaling, you’ll document not only your path but also your personal growth, guiding you toward deeper understanding and peace with each stride.
Mindfulness Through Movement
Mindfulness through movement invites you to fully engage with each step, enhancing your walking experience with intentional awareness.
As you stroll, feel your feet connect with the ground, the subtle shift of weight, and the rhythm of your breath. Let the sights and sounds around you become a soothing backdrop for deep reflection.
Notice the colors of the leaves, the texture of the air, and the whispers of nature, all cradling you in the moment. Allow your thoughts to flow, not judging but simply observing.
This mindful meander isn’t just exercise; it’s a gentle embrace of your surroundings and self. As you walk with intention, you create a sanctuary within, nurturing your spirit and heart with each step taken.